
Validating Dates in Excel. Ensuring users select dates only from specific intervals is crucial for effective data analysis and reducing unnecessary workload. In this article, we’ll explore how to implement data validation for specified date ranges, enabling users to enter dates only within the defined time frame.
Let’s illustrate this concept with an example in Excel:
Example: Implementing Validating Dates in Excel
Suppose we have a specified date interval defined in cells D2 and E2. D2 contains the start date, October 2nd, 2019, and E2 contains the end date, October 9th, 2019. Users are expected to input meeting dates in cell A2, ensuring these dates fall within the specified time interval.
To implement date Validating Dates in Excel, follow these steps:
- Select the cell(s) where you want to apply validation.
- Navigate to Data -> Validation, or use the keyboard shortcut ALT+A+V+V.
- Choose ‘Custom’ under the Allow section.
- In the Formula field, input the following formula:
=AND(A2>=$D$2,A2<=$E$2)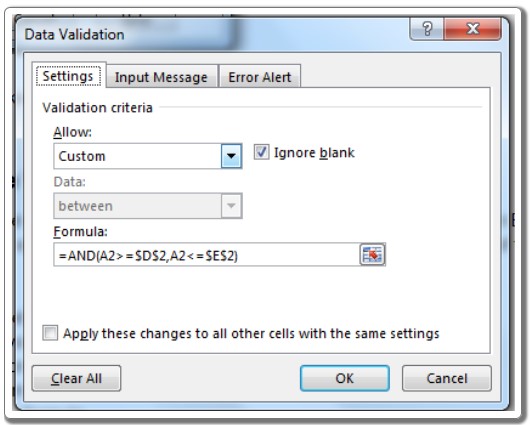
- In the Error Alert tab, display the message: “Enter date within the specified date interval.”
- Click OK to complete the process.
Now, if you attempt to input a date outside the defined range in cells D2 and E2, Excel will reject the input. Moreover, the validation adjusts automatically as you modify the start and end dates, eliminating the need to update the data validation settings manually.
If you prefer fixed start and end dates, you can hardcode the formula as follows:
=AND(A2>=DATE(2019,10,2),A2<=DATE(2019,10,9))
This formula ensures that the user’s input falls between October 2nd, 2019, and October 9th, 2019. To apply this validation to other cells, copy A2 and use the ‘Paste Special’ feature specifically for data validation.
How It Works: The validation uses the AND function to check two criteria:
- Check if the input (A2) is greater than or equal to the start date (D2).
- Check if the input is less than or equal to the end date (E2).
Validating Dates in Excel. If both criteria are met (both return TRUE), the input is accepted. If either criterion returns FALSE, the input is rejected.
That’s how you implement date validation in Excel. If you have any questions about this topic or any other Excel/VBA-related queries, feel free to ask in the comments section below. Your feedback and queries are highly valuable.


