Applying automatic numbering to tables in Word is a breeze. Once you’ve inserted automatic numbering into a table’s columns or rows, you won’t have to manually adjust the numbering when you add or remove rows or columns. The automatic numbering will update itself seamlessly. This guide will walk you through the process of adding automatic numbering to a table’s columns or rows. To make it clearer, I’ll demonstrate how to insert automatic numbering into the first column on the left in the table below.
Step 1: Highlight the first column, then navigate to the Home tab and click on AutoNumber. Refer to the screenshot below for visual aid:

![]()

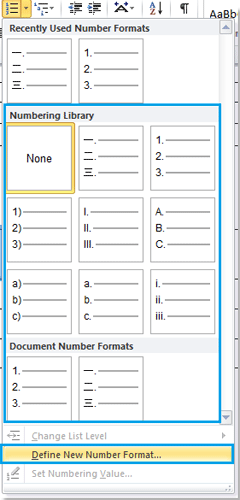
Step 2: Choose your preferred format from the Numbering Library, or create a custom format using Define New Number Format. See the screenshot for reference:

Step 3: The automatic numbering will be inserted at the cursor position. Check the screenshot for clarity:

Step 4: Try deleting the second row; you’ll notice that the numbering in the first column automatically adjusts. See the screenshot:

How to Automatically Number Columns or Rows in Word Tables

![]()
Note: You can also use this method to automatically number a row; the only distinction is that you need to highlight the row first.


